Home>Furniture & Design>Outdoor Furniture>How To Make An Outdoor Chalkboard
Outdoor Furniture
How To Make An Outdoor Chalkboard
Modified: January 18, 2024
Learn how to create an outdoor chalkboard for your outdoor furniture and design. Get step-by-step instructions and design ideas for your outdoor space.
(Many of the links in this article redirect to a specific reviewed product. Your purchase of these products through affiliate links helps to generate commission for Storables.com, at no extra cost. Learn more)
Introduction
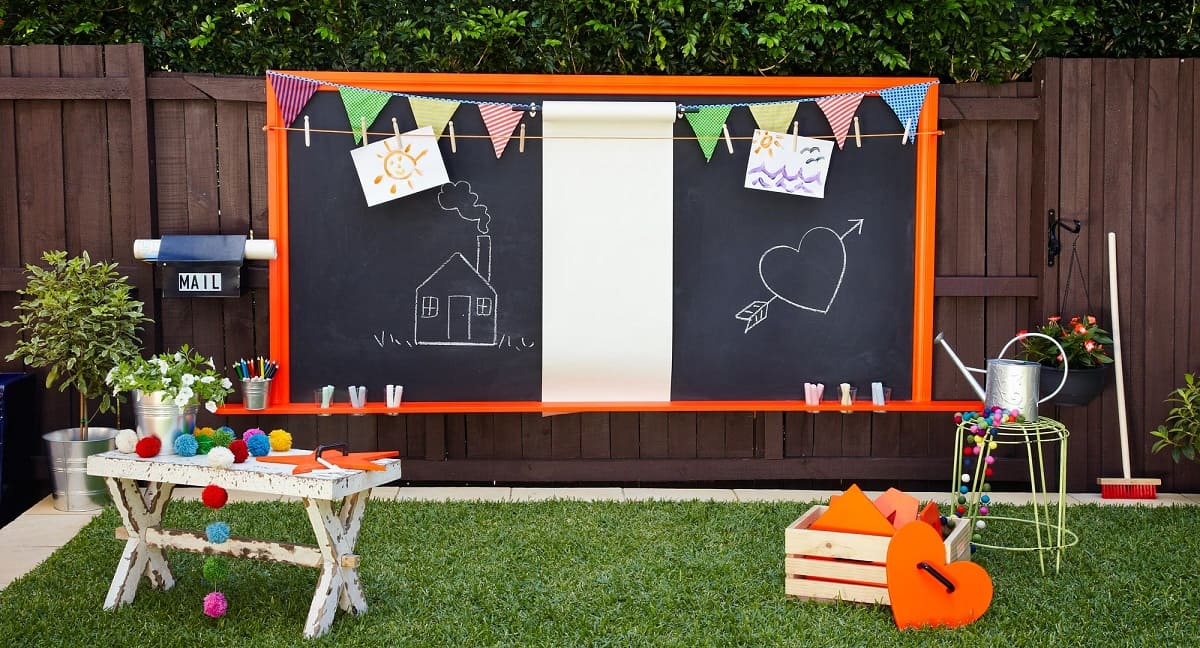
Creating an outdoor chalkboard is a fantastic way to add a touch of creativity and functionality to your outdoor space. Whether you want to encourage your kids to unleash their artistic flair or simply enjoy the nostalgic pleasure of doodling alfresco, an outdoor chalkboard can be a wonderful addition to your backyard, patio, or garden.
Not only does it provide an outlet for artistic expression, but it also serves as a versatile tool for leaving messages, jotting down reminders, or even displaying menus and schedules for outdoor gatherings. The process of making an outdoor chalkboard is a delightful DIY project that can be customized to suit your space and style. With the right materials and a bit of creativity, you can craft a charming and practical outdoor feature that will be enjoyed by family and friends alike.
In this guide, we will walk you through the step-by-step process of creating your own outdoor chalkboard, from selecting the ideal location and preparing the surface to building the frame and seasoning the chalkboard for optimal use. So, roll up your sleeves, gather your materials, and get ready to embark on a fun and rewarding outdoor DIY adventure!
Key Takeaways:
- Embrace creativity and functionality by crafting an outdoor chalkboard, perfect for artistic expression and practical use in your backyard or garden.
- With careful location selection, surface preparation, and sturdy frame construction, you can create a charming outdoor chalkboard for endless moments of joy and connection.
Materials Needed
Before diving into the project, it’s essential to gather all the necessary materials. Here’s what you’ll need to create your outdoor chalkboard:
- 1. Plywood or Hardboard: Choose a sturdy and weather-resistant material for the chalkboard surface. Exterior-grade plywood or hardboard are ideal options.
- 2. Chalkboard Paint: Opt for high-quality outdoor chalkboard paint that is designed to withstand the elements.
- 3. Wood for Frame: Select treated lumber or cedar to construct the frame. These materials are durable and naturally resistant to decay.
- 4. Screws and Nails: Ensure you have the appropriate fasteners for attaching the frame and mounting the chalkboard.
- 5. Wood Glue: A strong adhesive will be necessary for securing the frame joints.
- 6. Sandpaper: Use fine-grit sandpaper to smooth the edges and surface of the chalkboard.
- 7. Paintbrushes or Rollers: Depending on the size of the chalkboard, gather suitable brushes or rollers for applying the chalkboard paint.
- 8. Chalk: Don’t forget to pick up a supply of colorful chalk for drawing and writing on your new outdoor chalkboard.
- 9. Tape Measure and Level: These tools will help ensure precision when positioning and mounting the chalkboard.
- 10. Protective Gear: Wear safety goggles, gloves, and a dust mask when working with wood and paint to protect yourself.
By having these materials on hand, you’ll be well-equipped to begin the process of constructing your outdoor chalkboard. Now that you’ve gathered your supplies, it’s time to move on to the first step: choosing the right location for your outdoor chalkboard.
Step 1: Choosing the Right Location
Before you start building your outdoor chalkboard, it’s crucial to select the perfect spot for it to reside. Consider the following factors when choosing the location:
- 1. Accessibility: Ensure that the chalkboard is easily accessible to those who will be using it. A central location in the backyard or near a patio area is often ideal.
- 2. Sun Exposure: Take note of the sun’s path throughout the day. While some sun exposure is beneficial, excessive direct sunlight can cause chalkboard surfaces to fade over time. Aim for a balance of shade and sunlight.
- 3. Protection from Elements: If possible, position the chalkboard in an area that is sheltered from heavy rain and strong winds. This will help prolong its lifespan and maintain its appearance.
- 4. Safety Considerations: Keep in mind the safety of the location, especially if children will be using the chalkboard. Choose a spot away from potential hazards and obstacles.
- 5. Aesthetic Appeal: Consider how the chalkboard will complement the overall aesthetic of your outdoor space. Whether it’s against a garden wall, on a fence, or freestanding, the location should enhance the visual appeal of the area.
Once you’ve identified the perfect location for your outdoor chalkboard, you can move on to the next step: preparing the chalkboard surface. By carefully selecting the placement, you’ll ensure that your outdoor chalkboard becomes a functional and delightful addition to your outdoor environment.
Step 2: Preparing the Chalkboard Surface
With the location chosen, it’s time to prepare the surface of the chalkboard. Follow these steps to ensure the chalkboard surface is ready for painting:
- 1. Sanding the Surface: Begin by sanding the plywood or hardboard to create a smooth and even texture. Use fine-grit sandpaper to remove any rough spots or imperfections.
- 2. Cleaning the Surface: After sanding, wipe the surface clean with a damp cloth to remove any dust or debris. Ensure the surface is completely dry before proceeding.
- 3. Applying Chalkboard Paint: Using a high-quality outdoor chalkboard paint, apply the first coat evenly across the prepared surface. Allow it to dry according to the manufacturer’s instructions before applying a second coat for complete coverage.
- 4. Curing the Surface: Once the final coat is applied, allow the chalkboard paint to cure for the recommended time. This process is essential for the paint to fully adhere and provide a durable, writable surface.
By meticulously preparing the chalkboard surface, you’ll ensure that it provides an optimal canvas for artistic expression and practical use. With the surface ready, you can now proceed to the next step: building the chalkboard frame.
When making an outdoor chalkboard, use a weather-resistant material like marine-grade plywood or metal. Apply multiple coats of outdoor paint for durability. Add a chalk tray at the bottom to keep chalk within reach.
Step 3: Building the Chalkboard Frame
Constructing a sturdy frame for your outdoor chalkboard is essential for both structural support and aesthetic appeal. Follow these steps to build the frame:
- 1. Measuring and Cutting the Lumber: Begin by measuring the dimensions of the chalkboard surface. Cut the lumber to create the frame, ensuring that the corners are mitered for a seamless join.
- 2. Assembling the Frame: Using wood glue and screws, assemble the frame around the chalkboard surface. Ensure that the frame fits snugly and securely, providing ample support for the chalkboard.
- 3. Adding Decorative Touches (Optional): If desired, consider adding decorative elements to the frame, such as routed edges or carved designs, to enhance the visual appeal of the chalkboard.
- 4. Weatherproofing the Frame: To protect the frame from the elements, consider applying a weatherproof sealant or outdoor paint to ensure its longevity.
By carefully constructing the frame, you’ll not only provide essential support for the chalkboard but also infuse a touch of craftsmanship into the outdoor feature. With the frame in place, you can now move on to the next step: mounting the chalkboard.
Read also: 9 Unbelievable Chalkboard Paint For 2024
Step 4: Mounting the Chalkboard
Mounting the chalkboard securely is crucial to ensure its stability and longevity. Follow these steps to properly mount the chalkboard:
- 1. Positioning the Chalkboard: With the help of a level, position the chalkboard in the chosen location, ensuring that it is straight and aligned as desired.
- 2. Attaching the Chalkboard: Using appropriate screws or fasteners, attach the chalkboard to the chosen surface or mounting structure. Ensure that the fasteners are driven securely into the frame and the surface behind it.
- 3. Checking Stability: After mounting, ensure that the chalkboard is stable and firmly attached. Give it a gentle shake to test its stability and make any necessary adjustments.
- 4. Finishing Touches: Once the chalkboard is securely mounted, inspect the frame and surface for any imperfections or loose components. Make any final adjustments or touch-ups as needed.
By carefully mounting the chalkboard, you’ll ensure that it remains securely in place, ready to be adorned with colorful creations and practical notes. With the chalkboard mounted, you can now proceed to the final step: seasoning the chalkboard for optimal use.
Step 5: Seasoning the Chalkboard
Seasoning the chalkboard is a crucial step that prepares the surface for regular use and ensures easy erasability. Follow these steps to season the chalkboard:
- 1. Covering the Surface: Using the side of a piece of chalk, thoroughly cover the entire chalkboard surface with a layer of chalk.
- 2. Blending the Chalk: Once the surface is covered, use a dry cloth or chalkboard eraser to blend the chalk into the surface, creating a hazy layer.
- 3. Erasing and Cleaning: After allowing the blended chalk to set for 24 hours, gently erase the entire surface with a dry eraser or cloth. This process will remove the excess chalk and leave a faint chalky residue on the surface.
- 4. Ready for Use: Your chalkboard is now seasoned and ready for use. The seasoning process creates a chalk-friendly surface that allows for smooth writing and easy erasing without leaving ghost images behind.
By properly seasoning the chalkboard, you’ll ensure that it provides an optimal writing and drawing experience from the very first use. With the chalkboard seasoned, you can step back and admire your handiwork, knowing that you’ve created a delightful and functional outdoor feature that will be enjoyed for years to come.
Conclusion
Congratulations! By following the steps outlined in this guide, you’ve successfully created your very own outdoor chalkboard. This charming addition to your outdoor space not only serves as a canvas for artistic expression but also provides a practical platform for leaving messages, jotting down ideas, and adding a touch of whimsy to your outdoor environment.
With careful consideration of the location, meticulous preparation of the chalkboard surface, and the construction of a sturdy frame, you’ve crafted a feature that seamlessly blends functionality and aesthetics. The process of mounting the chalkboard securely ensures its stability, while the essential seasoning step guarantees optimal performance for all your chalk-based creations.
As you stand back and admire your handiwork, envision the countless moments of creativity and communication that will unfold around this delightful outdoor chalkboard. Whether it’s a colorful masterpiece created by little hands, an inspirational quote that brightens someone’s day, or a handy reminder for upcoming gatherings, your outdoor chalkboard is poised to become a beloved focal point in your outdoor oasis.
So, grab a piece of chalk, unleash your imagination, and let the outdoor chalkboard become a canvas for countless moments of joy, expression, and connection. As the seasons change and memories are made, your outdoor chalkboard will stand as a testament to your creativity and craftsmanship, adding a touch of whimsy and wonder to your outdoor haven.
Now, sit back, relax, and revel in the delightful addition you’ve made to your outdoor space. Your outdoor chalkboard is ready to inspire, entertain, and captivate all who encounter its creative allure.
Frequently Asked Questions about How To Make An Outdoor Chalkboard
Was this page helpful?
At Storables.com, we guarantee accurate and reliable information. Our content, validated by Expert Board Contributors, is crafted following stringent Editorial Policies. We're committed to providing you with well-researched, expert-backed insights for all your informational needs.


0 thoughts on “How To Make An Outdoor Chalkboard”