Home>Articles>20 Small Patio Ideas To Maximize Your Outdoor Space
Articles
20 Small Patio Ideas To Maximize Your Outdoor Space
Modified: January 8, 2024
Discover 20 small patio ideas to transform your outdoor space. Read articles on maximizing your patio for a stylish and functional area.
(Many of the links in this article redirect to a specific reviewed product. Your purchase of these products through affiliate links helps to generate commission for Storables.com, at no extra cost. Learn more)
Introduction
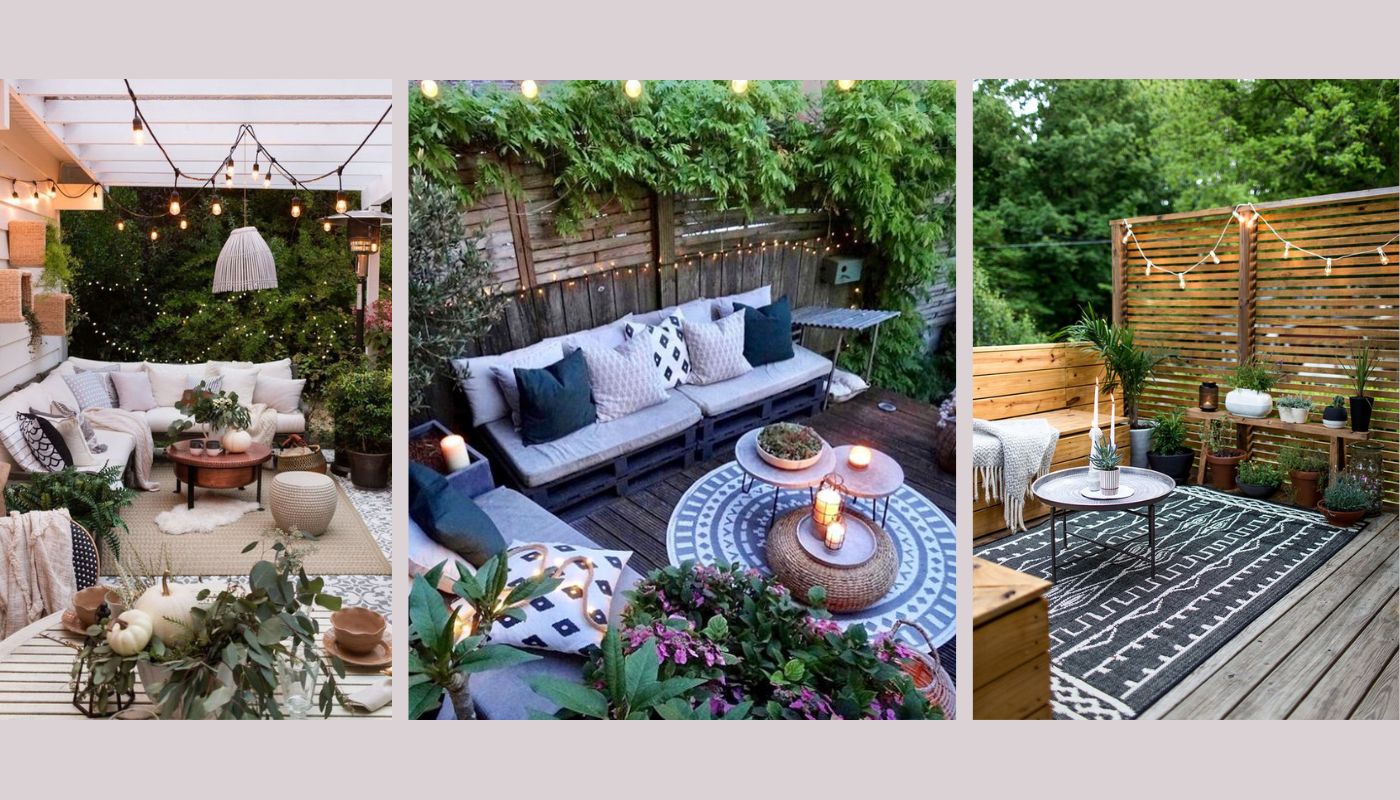
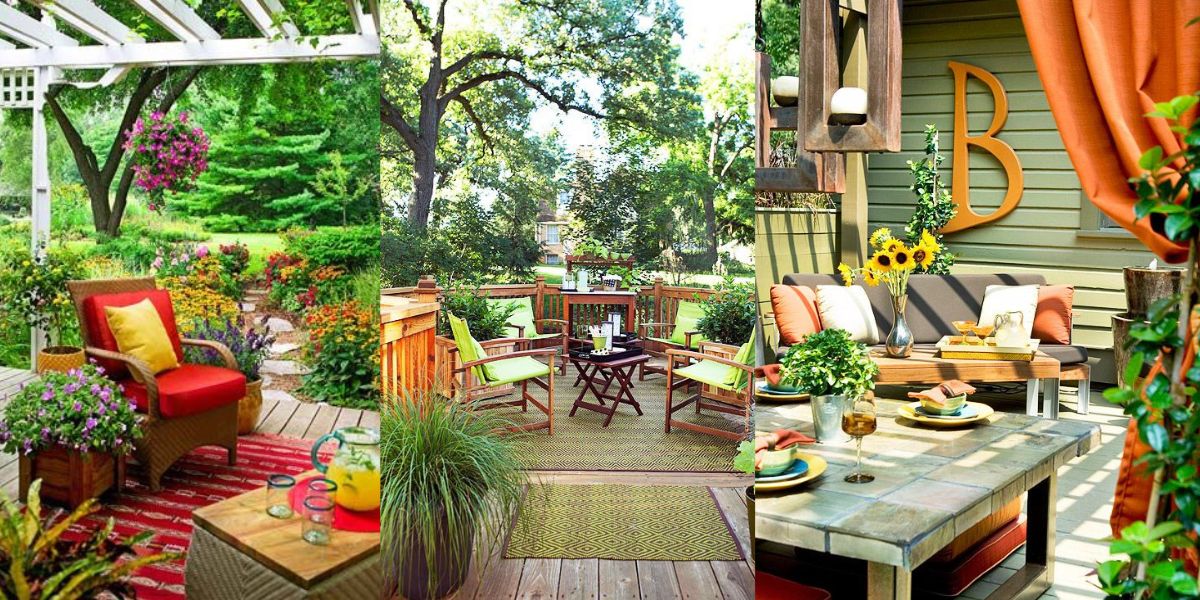
Having a small patio doesn’t mean you can’t create a beautiful and functional outdoor space. In fact, with the right design ideas and a little creativity, you can maximize your patio’s potential and turn it into a charming oasis for relaxation and entertainment. Whether you have a tiny balcony, a compact courtyard, or a petite backyard, there are various ways to make the most of your outdoor area.
In this article, we’ll explore 20 small patio ideas that will help you transform your limited space into a stylish and inviting retreat. From vertical gardens to compact furniture and clever storage solutions, these ideas will inspire you to reimagine your outdoor space and create an extension of your home that you can enjoy year-round.
Key Takeaways:
- Transform your small patio into a charming oasis by incorporating vertical gardens, compact furniture, and clever dual-purpose pieces. Maximize space and style to create a functional and inviting outdoor retreat.
- Elevate your small patio with features like hanging plants, outdoor rugs, and privacy screens. Embrace creativity and personalization to make the most of your limited outdoor space.
Vertical Gardens
When space is limited, thinking vertically is a smart strategy. Vertical gardens offer a practical and beautiful way to add greenery to your small patio without taking up valuable floor space. These living walls can be created using a variety of methods, such as wall-mounted planters, hanging pots, or trellises.
There are many benefits to incorporating a vertical garden into your patio design. Not only do they add visual interest and a touch of nature to your space, but they can also improve air quality and provide insulation against noise and extreme temperatures. Plus, growing herbs or small vegetables vertically allows you to have a mini kitchen garden right outside your door.
When planning your vertical garden, consider the amount of sunlight your patio receives and choose plants that are suitable for those conditions. Succulents, trailing vines, and ferns are excellent choices for shaded areas, while herbs, flowers, and leafy greens thrive in sunnier spots. Additionally, be mindful of the weight of the planters or structures and ensure they are securely installed to prevent accidents.
To create a stunning vertical garden, you can mix different plant varieties and colors, create patterns with the placement of pots or planters, and experiment with different textures and leaf shapes. Don’t be afraid to get creative and let your green thumb shine.
Remember to regularly water and maintain your vertical garden to keep it vibrant and lush. Consider investing in a drip irrigation system or self-watering planters to simplify the watering process, especially if you have a busy schedule.
By adding a vertical garden to your small patio, you’ll not only elevate the aesthetic appeal but also optimize your space by using the walls as a canvas for your plant collection.
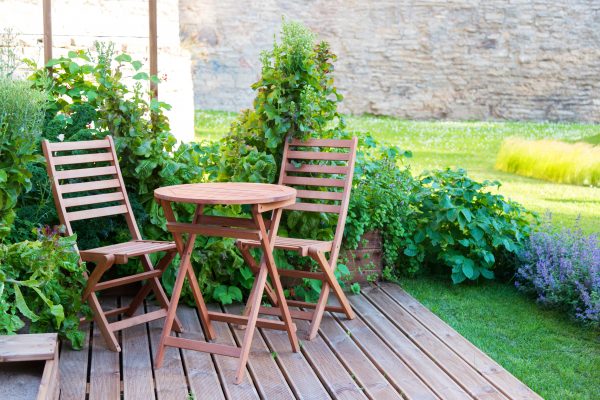
Compact Furniture
When it comes to furnishing a small patio, choosing compact and multi-functional furniture is key. Opt for pieces that are specifically designed for small spaces, such as bistro sets, foldable tables, and stackable chairs.
Bistro sets, which typically consist of a small table and two chairs, are perfect for intimate outdoor dining or enjoying a cup of coffee. They take up minimal space and are available in a variety of styles and materials to suit your taste.
Foldable tables are a practical solution for small patios as they can be easily expanded when needed and folded away for storage when not in use. Look for tables with collapsible sides or drop-leaves that can be adjusted based on your space requirements.
Similarly, stackable chairs are a great space-saving option as they can be neatly stacked and stored when not in use. Go for lightweight materials like aluminum or plastic, which are durable and easy to move around as needed.
When choosing furniture for your small patio, consider the scale and proportion of the pieces. Oversized furniture can overwhelm the space and make it feel cramped, while petite furniture can create a sense of openness. Pay attention to the dimensions and measurements to ensure that the furniture fits well and allows for easy movement around the patio.
In terms of style, opt for furniture with clean lines and minimalistic designs to create a sleek and uncluttered look. If you prefer a more eclectic or bohemian feel, mix and match different styles and materials to add visual interest while maintaining a cohesive overall aesthetic.
Lastly, don’t forget about storage options for your patio. Look for furniture pieces with built-in storage compartments or consider adding outdoor storage boxes or benches where you can store cushions, gardening tools, or other patio essentials. This will help you keep your patio organized and free from clutter.
By choosing compact and versatile furniture, you can maximize your small patio’s functionality while still providing a comfortable and stylish outdoor seating and dining area.
Built-in Benches
One of the best ways to maximize seating space in a small patio is by incorporating built-in benches. Built-in benches not only provide additional seating options but also help save valuable floor space. They can be designed to fit snugly against a wall or along the perimeter of your patio, making efficient use of the available area.
When considering built-in benches for your small patio, think about the materials and style that will best complement the overall design. Wood benches are a popular choice as they offer a timeless and natural look. You can choose from different types of wood, such as cedar or teak, that are resistant to outdoor elements and require minimal maintenance.
Another option is to use concrete or stone for your built-in benches. These materials are durable and can withstand the elements while adding a modern or rustic touch to your patio. You can even incorporate cushions or pillows on top of the benches to make them more comfortable and inviting.
To make the most out of your built-in benches, consider adding storage space underneath. This can be achieved by incorporating hinged or removable seat panels that open up to reveal storage compartments for cushions, blankets, or other outdoor essentials.
Furthermore, you can enhance the functionality and aesthetics of your built-in benches by adding decorative elements such as built-in planters or LED lighting. These features not only provide visual interest but also add a touch of greenery or ambiance to your outdoor space.
In terms of placement, consider positioning the built-in benches in areas that offer the best views or create cozy nooks for conversation and relaxation. You can even add a small table or coffee ledge adjacent to the benches for convenience.
Remember to incorporate cushions or pillows on the benches to add comfort and style. Opt for outdoor fabrics that are resistant to fading and moisture, ensuring that they will withstand the elements and remain in good condition.
By incorporating built-in benches into your small patio design, you can optimize seating space and create a cozy and functional outdoor seating area that maximizes the available space.
Hanging Plants
Adding hanging plants to your small patio is an excellent way to bring life and greenery to your outdoor space without taking up valuable floor space. Hanging plants not only add visual interest and beauty but also create a sense of depth and verticality, making your patio feel more spacious.
There are various ways to incorporate hanging plants into your patio design. You can hang them from hooks or brackets on walls, railings, or pergolas. Alternatively, you can use macrame plant hangers or hanging baskets to suspend the plants from the ceiling or beams.
When choosing plants for your hanging display, consider their light and water requirements as well as the climate in your area. Opt for plants that are suitable for the amount of sunlight your patio receives, whether it’s full sun, partial shade, or deep shade. Sun-loving plants like petunias, geraniums, and trailing vines are perfect for sunny spots, while ferns and pothos thrive in shadier areas.
To create a striking visual display, mix different types of plants with varying heights, textures, and colors. Combine cascading plants with upright or bushy varieties to add dimension and drama to your hanging garden. Consider using trailing foliage plants like ivy or spider plants, colorful flowers like fuchsias or begonias, or even herbs like basil or oregano for a functional touch.
Proper care and maintenance are essential for the health and longevity of your hanging plants. Make sure to water them regularly, but avoid overwatering as it can lead to root rot. Hanging plants often dry out faster, so it’s important to monitor their moisture levels and adjust your watering schedule accordingly.
In addition to regular watering, be mindful of fertilizing your hanging plants. Use a balanced water-soluble fertilizer or slow-release granules to provide essential nutrients, following the instructions on the package for proper dilution and application.
Lastly, keep an eye on the growth of your hanging plants and trim or prune them as needed to maintain their shape and prevent overcrowding. Remove any dead or yellowing leaves to promote healthy growth and allow air circulation.
By incorporating hanging plants into your small patio design, you can create a lush and vibrant oasis that adds beauty and a breath of fresh air to your outdoor living space.
Outdoor Rugs
Adding an outdoor rug to your small patio is a simple yet effective way to define the space and create a cozy and inviting atmosphere. Outdoor rugs not only provide visual interest but also add comfort underfoot and can tie together the different elements of your patio design.
When choosing an outdoor rug, opt for materials that are durable and weather-resistant, such as polypropylene or synthetic fibers. These materials are designed to withstand the elements and are easy to clean.
Consider the size and shape of your patio when selecting an outdoor rug. If you have a small patio, choose a rug that is proportionate to the space, ensuring that it doesn’t overwhelm or crowd the area. Rectangular or square-shaped rugs are ideal for patio layouts with defined seating or dining areas, while round rugs can soften the edges of a corner or create a focal point in the center of the patio.
When it comes to patterns and colors, you have a wide range of options depending on your personal style and the overall theme of your outdoor space. Use bold and vibrant patterns to make a statement or opt for neutral tones for a more subtle and timeless look. You can even find outdoor rugs that mimic the texture and appearance of natural materials like sisal or jute, adding a touch of organic beauty to your patio.
In terms of placement, position the outdoor rug under key furniture pieces, such as a dining table or seating area, to anchor the space and create a cohesive look. Make sure to leave enough space around the edges of the rug to allow for easy movement and access to other parts of the patio.
Outdoor rugs are not only aesthetically pleasing but also functional. They can provide a soft and comfortable surface for bare feet, making your patio more enjoyable and inviting. Additionally, outdoor rugs can protect your patio surface from scratches and damage.
However, it’s important to note that outdoor rugs are not completely impervious to the elements. To prolong their lifespan and maintain their appearance, it’s recommended to clean them regularly and store them indoors during harsh weather conditions or when not in use for an extended period.
By adding an outdoor rug to your small patio, you can effortlessly elevate the style and comfort of your outdoor space, creating a warm and inviting ambiance that extends your living area to the great outdoors.
Dual-Purpose Pieces
When working with a small patio, it’s important to make every piece of furniture and decor count. That’s where dual-purpose pieces come in handy. These clever and versatile items serve multiple functions, allowing you to maximize your space and get the most out of your patio.
One popular example of a dual-purpose piece is a storage ottoman or bench. These furniture pieces not only provide extra seating but also offer hidden storage space inside. You can store cushions, blankets, or other outdoor accessories, keeping your patio tidy and organized.
Another dual-purpose furniture option is a coffee table with built-in storage compartments. These tables offer a convenient place to set down drinks and snacks while also providing space to store books, magazines, or other small items. Some coffee tables even have adjustable heights, allowing them to double as dining tables when needed.
Outdoor benches with built-in planters or storage are also excellent dual-purpose pieces. These benches provide seating while also serving as a place to display your favorite plants or store gardening tools. They offer both functionality and visual appeal to your small patio.
When it comes to decor, consider using items that can serve multiple purposes. For example, a decorative lantern can not only add ambiance to your patio but also double as a candle holder or even a small plant container. By choosing versatile and multi-functional decor pieces, you can make the most out of your limited space.
Additionally, think about incorporating furniture pieces that can be easily moved or rearranged to accommodate different activities or to create a more open space when needed. This flexibility allows you to customize your patio based on your specific needs and preferences.
When selecting dual-purpose pieces for your patio, ensure that they are well-made and durable to withstand outdoor conditions. Look for materials that are weather-resistant and easy to clean, such as aluminum, rattan, or treated wood.
A small patio doesn’t mean you have to sacrifice functionality or style. By incorporating dual-purpose pieces into your design, you can optimize your space, declutter your patio, and create a versatile and functional outdoor living area.
Wall-Mounted Shelves
In a small patio, making use of vertical space is essential to maximize storage and display options. Wall-mounted shelves are a practical solution for adding storage and decorative elements without taking up valuable floor space.
Wall-mounted shelves come in various styles and designs, allowing you to choose the one that best suits your patio’s aesthetic. You can opt for open shelves to showcase plants, candles, or other decorative items, or choose shelves with doors or drawers to store smaller items or keep them out of sight.
When installing wall-mounted shelves, consider the weight-bearing capacity and make sure they are securely attached to the wall. Choose shelves made of durable materials, such as metal or treated wood, that are designed for outdoor use and can withstand the elements.
Wall-mounted shelves offer versatility in their placement. Depending on the layout of your patio, you can install them vertically to create a stunning vertical garden effect or horizontally to create additional surface space for storage and display.
Optimize the functionality of your wall-mounted shelves by organizing items in a practical and visually appealing manner. Group similar items together and use baskets or decorative containers to keep smaller items organized. Consider incorporating hooks or hanging racks alongside the shelves to hang gardening tools, hats, or other accessories.
In terms of styling, use wall-mounted shelves to showcase your personal style and add visual interest to your patio. Mix and match different decorative elements like succulents, lanterns, artwork, or outdoor-friendly ornaments to create a personalized and inviting display. You can also incorporate lighting features like small LED spotlights or string lights to highlight your shelves and the items on them.
Remember to regularly clean and maintain your wall-mounted shelves to keep them looking their best. Dust or wipe them down as needed and inspect for any damage or signs of wear.
By installing wall-mounted shelves in your small patio, you can maximize storage opportunities, add a decorative touch, and create an organized and visually appealing outdoor space.
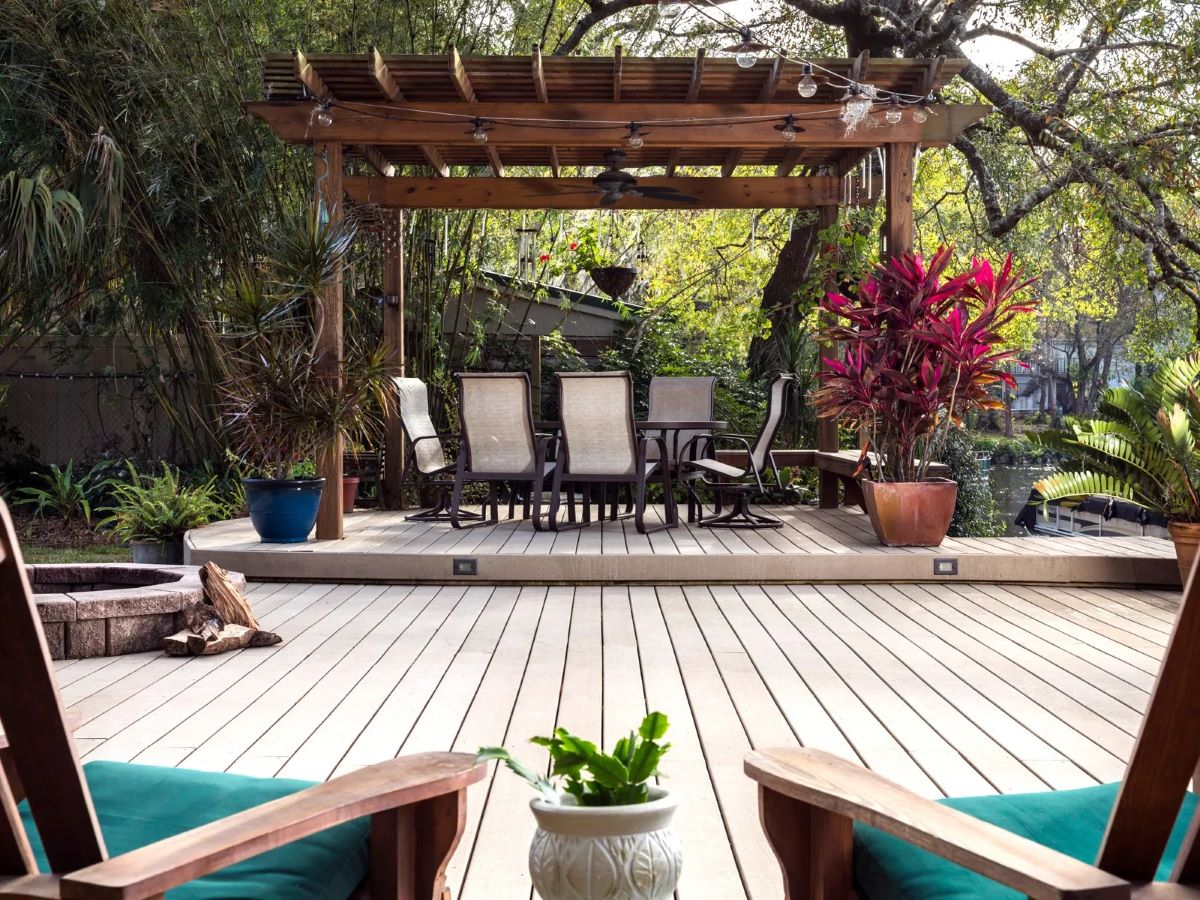
String Lights
No matter the size of your patio, string lights are a magical addition that can instantly transform the ambiance and create a warm and inviting atmosphere. These enchanting lights can add a touch of sparkle and create a cozy and romantic outdoor setting.
String lights come in various types and lengths, allowing you to customize their placement based on your patio’s layout and design. You can string them along the perimeter of your patio, drape them across a pergola or trellis, or hang them from tree branches or poles.
When choosing string lights, opt for outdoor-rated and weather-resistant options that are designed to withstand the elements. LED string lights are energy-efficient and long-lasting, making them a popular choice for outdoor use.
There are different styles of string lights to choose from, including classic white bulbs for an elegant or vintage look, or colorful and festive options for a fun and playful atmosphere. You can even find string lights with unique shapes, such as lanterns or stars, to add a whimsical touch to your patio.
One of the advantages of string lights is their versatility. They can be used year-round to create a cozy ambiance, whether you’re enjoying summer nights or want to bring a festive feel during the holiday season.
String lights are not only visually appealing but also functional. They provide soft and ambient lighting, making your patio more usable during the evening hours. They can be a great alternative to harsh overhead lights or create a dreamy space for outdoor dining or relaxation.
Installation of string lights is relatively simple. You can attach them with hooks, zip ties, or clips, depending on your patio surfaces. Plan the placement of the lights beforehand, ensuring that they are evenly spaced and create the desired effect.
Remember to take proper precautions when working with electricity and outdoor lighting. Follow the manufacturer’s instructions for installation, use outdoor-rated extension cords, and consider using a timer or smart plug to control the lighting schedule.
No matter the size or style of your patio, string lights can create a magical and inviting atmosphere. They add a touch of charm and create a cozy space that you can enjoy day or night.
Potted Plants
Potted plants are a classic and versatile addition to any small patio. They not only bring a touch of nature and greenery but also add visual interest and charm to your outdoor space.
When choosing potted plants for your patio, consider the size and scale of your space. Opt for plants that are proportionate to the size of your patio, ensuring that they don’t overwhelm or create a crowded feel. Select a mix of plant sizes, from tall and striking plants to smaller and more compact options, to create a visually appealing display.
Choose plants that are suitable for the level of sunlight your patio receives. Some plants thrive in full sun, while others prefer shade or indirect light. Consider the microclimate of your patio, such as whether it’s exposed to wind or sheltered, and select plants accordingly.
Create an attractive arrangement by mixing different plant varieties with varying colors, textures, and leaf shapes. Combine flowering plants, such as petunias or geraniums, with foliage plants like ferns or succulents to create a dynamic and vibrant display. You can also add herbs or small vegetables to your potted plant collection for a functional and aromatic touch.
When selecting pots for your plants, choose materials that are suitable for outdoor use and align with your patio’s style. Terracotta pots provide a classic and rustic look, while ceramic or metal pots can help create a more contemporary or modern aesthetic. Make sure the pots have drainage holes to prevent overwatering and waterlogging.
Consider the placement of your potted plants to optimize their visual impact. Position them strategically around your patio, such as near seating areas or entrances, to create focal points and add depth to the space. You can also use vertical space by hanging plants from hooks or placing them on wall-mounted shelves.
Maintain the health and beauty of your potted plants by giving them proper care. Water them regularly, paying attention to their individual water requirements, and avoid overwatering. Ensure they receive adequate sunlight, and fertilize them according to the specific plants’ needs.
Regularly groom your potted plants by removing dead leaves or spent flowers to promote healthy growth and maintain their appearance. Prune or trim them if necessary to control their size and shape.
Potted plants not only add beauty and a touch of nature to your small patio but also enhance the air quality and create a soothing and calming atmosphere. They allow you to connect with nature and can be a source of relaxation and joy.
Folding Tables and Chairs
When it comes to small patios, flexibility is key. Folding tables and chairs are a perfect solution to maximize your outdoor space while maintaining the ability to accommodate guests and create a functional dining or seating area.
One of the main advantages of folding tables and chairs is their ability to be easily stored and compactly folded when not in use. This makes them ideal for small patios where space is limited, as they can be tucked away or stored in a shed or garage.
Choose folding tables and chairs that are specifically designed for outdoor use, as they are more durable and weather-resistant. Look for materials such as teak, aluminum, or synthetic wicker that can withstand the elements and require minimal maintenance.
When selecting a folding table, consider the size and shape that best fits your patio. Round or square tables are great for intimate gatherings, while rectangular tables offer more surface area for larger groups. Measure your patio to ensure the table fits comfortably and allows for easy movement around the area.
Pair your folding table with matching folding chairs or mix and match different styles for a more eclectic look. To create a cohesive aesthetic, choose chairs in materials and colors that complement the rest of your patio’s design. Look for chairs with comfortable seating and sturdy construction to ensure optimal comfort and durability.
During the warmer months, you can set up your folding table and chairs for outdoor dining or entertaining. Enjoy meals with family and friends or host a gathering on your patio, then easily fold and store the furniture when the event is over.
Folding tables and chairs also offer versatility in their placement. You can easily move them to different areas of your patio depending on the occasion or use. For example, you can create a cozy conversation area by placing a set of folding chairs around a small coffee table, or arrange them in a row for a more formal dining setup.
When it comes to maintenance, simply clean your folding tables and chairs regularly with mild soap and water. Store them in a dry and protected area during the winter or when not in use for an extended period to ensure their longevity.
Folding tables and chairs provide the perfect balance of functionality and convenience for small patios. They allow you to create a versatile and comfortable outdoor space that can adapt to your needs, making the most of your available space without sacrificing style or comfort.
Consider using multi-functional furniture, such as a bench with built-in storage or a table that can double as a serving cart. This will help maximize your small patio space while providing extra storage options.
Privacy Screens
Creating a sense of privacy is important for many small patio owners, especially if your outdoor space is adjacent to neighbors or a busy street. Privacy screens are an excellent solution to block unwanted views, add seclusion, and create a more intimate and secluded atmosphere on your patio.
Privacy screens come in various styles and materials, allowing you to choose the one that best suits your patio’s design and your personal preferences. Popular options include outdoor curtains, lattice panels, bamboo screens, or even trellises covered in climbing plants.
One of the benefits of privacy screens is their ability to add visual interest and enhance the overall look of your patio. You can choose screens that blend seamlessly with the existing architecture or landscape, or opt for bold designs and patterns to make a statement.
When selecting a privacy screen, consider the size and dimensions that will work best for your patio. Measure the area where you plan to install the screen to ensure a proper fit and maximum coverage. Additionally, consider the level of privacy you desire and choose a screen that provides the desired opacity or coverage.
Privacy screens can be used in various ways on your patio. They can be freestanding and placed strategically to create secluded corners or used as dividers to separate different functional areas, such as a dining space, lounging area, or even a garden.
Another advantage of privacy screens is their versatility. Many screens can be easily moved or adjusted to accommodate your changing needs. This flexibility allows you to adapt your patio layout and privacy requirements based on different occasions or seasons.
In addition to providing privacy, some screens can also serve other purposes. For instance, bamboo screens can provide shade and block out excessive sunlight, or trellises covered in climbing plants can create a stunning green backdrop and add natural beauty to your patio.
Maintenance of privacy screens will depend on the material you choose. Some screens may require occasional cleaning or treatment to prevent weathering or mold growth. Follow the specific care instructions provided by the manufacturer to keep your privacy screen in optimal condition.
By installing privacy screens on your small patio, you can create a secluded and intimate outdoor space that allows you to relax, entertain, and enjoy your patio without the worry of prying eyes or distractions from the surrounding areas.
Water Features
Introducing a water feature to your small patio is an excellent way to create a tranquil and soothing atmosphere. The gentle sound of water flowing or the sight of a shimmering fountain can add a sense of tranquility and transform your outdoor space into a serene oasis.
Water features come in various sizes and styles, allowing you to choose one that fits your patio’s layout and aesthetic. If you have limited space, opt for compact water features such as tabletop fountains or wall-mounted waterfalls. If you have a bit more room, a small pond or birdbath can be a charming addition.
When selecting a water feature, consider the scale and proportion that work best for your patio. Ensure that the size of the feature complements the space without overwhelming it. Pay attention to the materials used and choose options that are weather-resistant and suitable for outdoor use.
Water features not only add beauty but also provide a calming effect to your outdoor space. The sound of flowing water can mask unwanted noises and create a peaceful ambiance, helping you unwind and relax after a long day.
When it comes to placement, consider the focal point of your patio design. Position the water feature as a central element or near seating areas where it can be enjoyed and appreciated. If you have a small patio, integrating the water feature into a wall or corner can help maximize the available space.
Maintaining a water feature requires regular care and attention. Ensure that it is properly cleaned and maintained to prevent the growth of algae and maintain water clarity. Follow the instructions provided by the manufacturer for proper cleaning and maintenance procedures.
Furthermore, consider adding aquatic plants or decorative elements to enhance the appeal of your water feature. Water lilies, floating plants, or even colorful stones can add visual interest and create a more dynamic and vibrant display.
It’s important to note that if you choose to have a water feature with a pump or circulating system, it should be properly installed to avoid any water leakage or potential damage to your patio. Consult a professional if you’re unsure about the installation process.
By incorporating a water feature into your small patio, you can create a peaceful and serene environment that adds a touch of nature and tranquility to your outdoor space. It’s a beautiful addition that will leave you feeling refreshed and rejuvenated.
Outdoor Curtains
Outdoor curtains are a versatile and stylish addition to any small patio. They not only provide shade and protection from the sun but also add privacy and create a touch of elegance to your outdoor space.
When choosing outdoor curtains, opt for materials that are designed to withstand the elements, such as fade-resistant polyester or weather-resistant synthetic fabrics. Look for curtains that are specifically labeled as outdoor curtains to ensure their durability and longevity.
Consider the color and pattern of your outdoor curtains to complement the overall aesthetics of your patio. Lighter colors can create an airy and breezy feel, while darker hues can add drama and a more intimate ambiance. Stripes or patterns can also add visual interest and personality to your patio design.
Outdoor curtains can be used in a variety of ways on your small patio. They can be hung from pergolas, gazebos, or posts to create a shaded seating or dining area. Alternatively, you can hang them from hooks or curtain rods on walls or fences to define different zones or create a sense of enclosure.
In addition to adding privacy and shade, outdoor curtains can also help to regulate the temperature on your patio. They can block out excessive sunlight and create a cooler and more comfortable environment, allowing you to enjoy your outdoor space even on hot summer days.
Another advantage of outdoor curtains is their ability to create a soft and inviting atmosphere. The flowing fabric adds movement and texture, enhancing the visual appeal and adding a sense of relaxation and luxury to your patio.
Outdoor curtains are relatively easy to install. Depending on your patio’s features, you can hang them from hooks, attach them to curtain rods, or use curtain ties to secure them in place. Make sure they are properly anchored to withstand wind and other weather conditions.
When it comes to maintenance, outdoor curtains may require occasional cleaning to remove dirt, dust, or mildew. Some curtains can be machine-washed, while others may need spot cleaning or gentle handwashing. Follow the care instructions provided by the manufacturer for the best results.
By incorporating outdoor curtains into your small patio design, you can create a stylish and functional outdoor space that offers shade, privacy, and a touch of elegance. They add a sense of luxury and create an inviting atmosphere where you can relax and enjoy your patio to the fullest.
Fire Pit or Chiminea
Adding a fire pit or chiminea to your small patio can create a cozy and inviting atmosphere that extends your outdoor living season. These versatile and functional features not only provide warmth but also serve as a focal point and gathering place for friends and family.
A fire pit is a classic choice for a small patio. It can be either built-in or portable, depending on your preference and patio layout. Built-in fire pits can be customized to fit your patio’s aesthetic, while portable fire pits allow for flexibility and can be moved around as needed.
A chiminea, on the other hand, is a freestanding outdoor fireplace with a chimney-like structure. It provides a more contained fire and is often made of clay or cast iron, adding a touch of rustic charm to your patio.
Before installing a fire pit or chiminea, ensure that you check the local regulations and obtain any necessary permits or permissions. Safety should always be a priority, so follow the manufacturer’s instructions for proper installation, use, and maintenance.
When selecting a fire pit or chiminea, choose one that fits the size of your patio and allows for comfortable seating around it. Consider the materials used and ensure they are designed for outdoor use and can withstand high temperatures.
Fire pits and chimineas offer various fuel options, including wood-burning, propane, or gas-powered. Each has its own unique benefits and considerations. Wood-burning options provide a traditional and aromatic experience, while propane or gas options offer convenience and easy control of the flame.
One advantage of having a fire pit or chiminea is the versatility they offer. You can use them for warmth and ambiance during cooler evenings, but they can also serve as a focal point for outdoor cooking. Roasting marshmallows or cooking meals over the open flames can be a fun and unique experience.
When placing your fire pit or chiminea, ensure it is positioned on a fire-resistant surface or patio area. Keep it at a safe distance from any flammable materials, such as furniture, plants, or overhanging branches. It’s also important to have a fire extinguisher or water source nearby for safety purposes.
Please remember to practice fire safety and follow any local fire regulations or burn bans in your area. Always supervise the fire and extinguish it completely before leaving your patio or going to bed.
A fire pit or chiminea can create a warm and inviting outdoor space where you can gather with loved ones, enjoy the crackling flames, and make lasting memories. They add a cozy and charming atmosphere to your small patio, making it a place you’ll want to spend time in year-round.
Movable Planters
Movable planters are an excellent solution for small patios, allowing you to easily customize your outdoor space and optimize the arrangement of your plants. These versatile containers offer flexibility, convenience, and the ability to create a vibrant and ever-changing landscape on your patio.
One of the main advantages of movable planters is their ability to be easily relocated and rearranged. You can experiment with different layouts and configurations, finding the best arrangement that suits your patio’s size and design. This flexibility also allows you to adapt to changing seasons or sunlight conditions.
When selecting movable planters, consider the size, material, and drainage options. Choose containers that are appropriate for the size of your patio and the plants you wish to grow. Lightweight materials such as plastic, fiberglass, or resin are popular choices as they are easy to maneuver while still being durable.
Ensure that your planters have proper drainage holes to prevent overwatering and root rot. Alternatively, use self-watering planters that have a built-in reservoir, allowing your plants to draw water as needed.
Incorporate a variety of plant species in your movable planters to create visual interest and a dynamic display. Mix different colors, heights, and textures to add depth and create a lush environment. Consider using a combination of flowers, foliage plants, and even herbs or vegetables for a functional touch.
Movable planters also offer the opportunity to experiment with temporary or seasonal plantings. You can switch out plants based on their blooming seasons or try out different combinations throughout the year. This allows you to refresh the look of your patio and keep it visually appealing every time you make a change.
Additionally, movable planters can help overcome limitations in sunlight exposure. If your patio has areas with different levels of sunlight, you can adjust the position of your planters accordingly. Move them to sunny spots during the day and to shaded areas in the afternoon to ensure your plants receive the optimal amount of light.
When it comes to maintenance, movable planters offer convenience. Regularly monitor the moisture levels of your plants and water them as needed. Pay attention to the specific water requirements of each plant species and adjust your watering schedule accordingly.
Take advantage of the flexibility of movable planters by periodically reevaluating and rearranging your patio layout. Consider the growth and size of your plants, and ensure they have enough space to thrive. Prune or trim them as needed to maintain their shape and prevent overcrowding.
With movable planters, you have the freedom to transform your small patio into a versatile and ever-evolving garden. Enjoy the beauty and benefits of plants while being able to adapt your space to suit your needs and preferences.
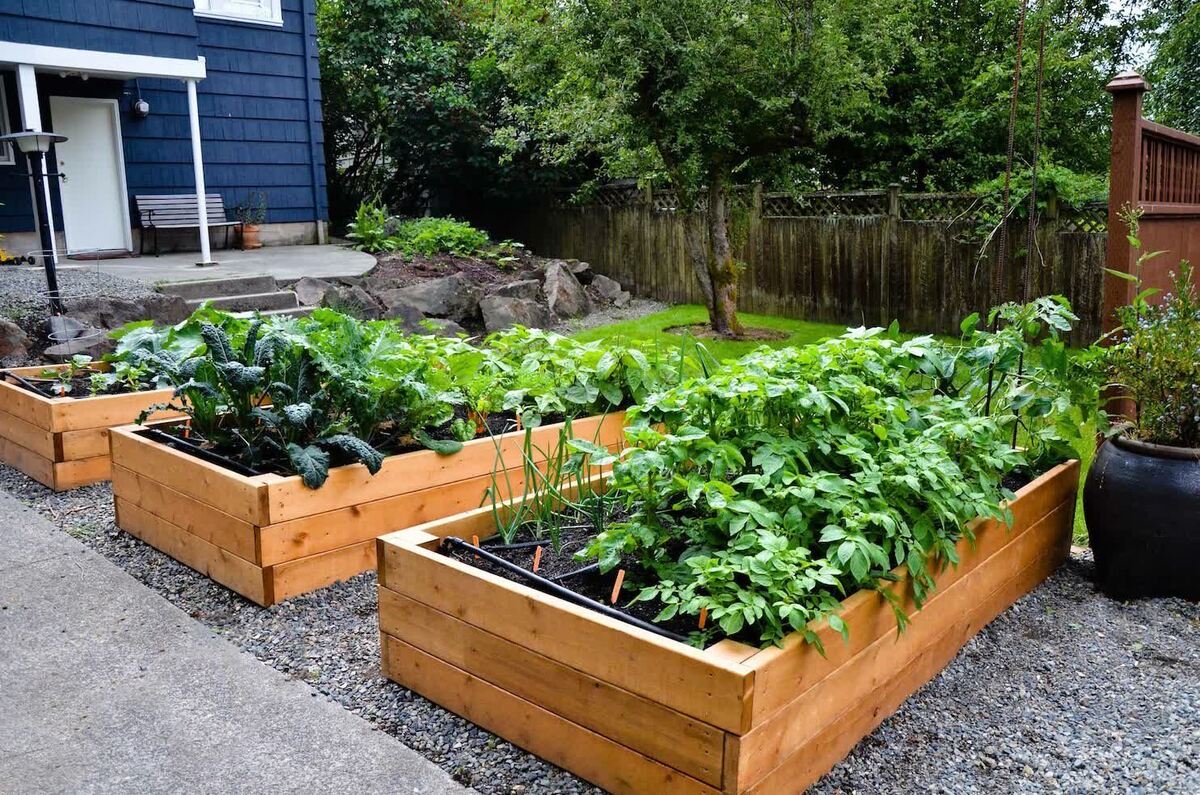
Herb or Vegetable Garden
Creating an herb or vegetable garden on your small patio is a rewarding and practical way to utilize your outdoor space. Not only will you have fresh ingredients at your fingertips, but you’ll also experience the joy of growing your own food and connecting with nature.
When planning your herb or vegetable garden, consider the available space and sunlight conditions on your patio. Most herbs and vegetables thrive in full sun, so choose an area that receives at least 6 hours of direct sunlight per day. If your patio is shaded, select herbs and vegetables that can tolerate or thrive in partial shade.
Start by selecting the herbs and vegetables you want to grow. Consider factors such as your local climate, the size of your patio, and your culinary preferences. Popular choices for small patio gardens include basil, mint, parsley, cherry tomatoes, lettuce, peppers, and bush beans.
Decide on the type of planting containers you will use for your herb or vegetable garden. Options include pots, planter boxes, or even vertical planters for maximizing space. Ensure that the containers have adequate drainage to prevent waterlogging and ensure the health of your plants.
Choose a quality potting mix or a specific soil mix for herbs and vegetables, as these plants have unique nutrient requirements. Add organic matter, like compost or well-rotted manure, to enrich the soil and promote healthy plant growth.
Follow the planting instructions for each herb or vegetable variety, including spacing recommendations and planting depth. Consider companion planting, where certain herbs and vegetables are planted together to provide mutual benefits or discourage pests.
Water your herb or vegetable garden regularly, keeping the soil moist but not waterlogged. Check the moisture levels by sticking your finger into the soil; if it feels dry, it’s time to water. Be mindful not to overwater, as excess moisture can lead to root rot.
Monitor your garden for pests and diseases. Handpick pests or use organic pest control methods if necessary. Regularly inspect your plants for signs of disease or nutrient deficiencies and address any issues promptly to prevent further damage.
Harvest herbs or vegetables when they reach the desired size or ripeness. Regular harvesting promotes continuous growth and ensures the best flavor and quality. Use your freshly harvested herbs and vegetables in your favorite recipes to savor the fruits of your labor.
Having an herb or vegetable garden on your small patio brings numerous benefits. It provides a sustainable and convenient source of fresh produce, enhances your cooking, and adds beauty and greenery to your outdoor space. Moreover, gardening can be a therapeutic and rewarding activity, helping you unwind and connect with nature.
Hammock or Swing
Adding a hammock or swing to your small patio is an excellent way to create a relaxing and inviting space where you can unwind and take a break from the busyness of everyday life. These comfortable and suspended seating options provide a perfect spot for lounging, reading, or simply enjoying the outdoors.
When choosing a hammock or swing for your small patio, consider the available space and the weight-bearing capacity of the structure. Measure the area where you plan to install it to ensure a proper fit and allow enough space for comfortable movement.
Hammocks come in various types, such as rope hammocks, fabric hammocks, or hammocks with spreader bars. Fabric hammocks tend to be more comfortable and offer better support, while rope hammocks have a more traditional and rustic charm.
Swings, on the other hand, can be hanging swings or freestanding swings. Hanging swings can be suspended from a sturdy structure like a pergola, while freestanding swings have their own frame and can be placed anywhere on your patio.
Consider the materials used for your hammock or swing, ensuring they are durable and designed for outdoor use. Look for weather-resistant fabrics or materials like canvas, polyester, or synthetic wicker that can withstand the elements and resist fading.
Placement is key when it comes to hammocks or swings. Hang your hammock between two strong anchor points, such as trees or posts. Make sure the suspension system is secure, and always test the hammock’s stability before use. For swings, ensure that they are placed on a stable and level surface.
When it comes to maintenance, follow any care instructions provided by the manufacturer. Regularly clean your hammock or swing to remove dirt or debris, and protect it from excessive sun exposure or inclement weather by covering or storing it when not in use.
Enhance the comfort of your hammock or swing by adding cushions or pillows. Choose outdoor fabrics that are resistant to water and fading, and opt for colors or patterns that complement your patio’s aesthetic.
Both hammocks and swings offer a peaceful and cozy spot on your small patio where you can relax and enjoy the outdoors. They provide a perfect escape, allowing you to soak in the beauty of nature and create precious moments of leisure and tranquility.
Artwork or Wall Decorations
Adding artwork or wall decorations to your small patio is a creative and personal way to infuse your outdoor space with style and personality. These decorative elements can transform a plain and ordinary patio into a visually captivating and inspiring environment.
When choosing artwork or wall decorations for your patio, consider the theme or style that you want to convey. Whether it’s a vibrant and eclectic design, a minimalist approach, or a nature-inspired motif, select pieces that align with your personal taste and complement the overall aesthetic of your patio.
Outdoor wall art comes in various forms and materials. Metal sculptures, wooden panels, ceramic tiles, or even painted murals are popular options that can withstand weather conditions. Look for pieces specifically labeled for outdoor use, as they are designed to resist fading and corrosion.
Consider the size and scale of your patio when selecting artwork. Large, bold pieces can make a statement and act as a focal point, while smaller pieces can add subtle charm and intricate details. Avoid overcrowding your patio with too many decorations, as it can make the space feel cluttered and overwhelming.
Placement is crucial for showcasing your artwork effectively. Identify areas on your patio where the artwork can take center stage, such as a blank wall or a prominent spot above a seating area. Hang the pieces at eye level, ensuring they are securely attached to withstand winds or other outdoor elements.
When it comes to maintenance, outdoor artwork or wall decorations may require occasional cleaning to remove dust or dirt. Use a soft cloth or sponge and mild detergent to gently wipe down the surface. Inspect the artwork periodically for signs of damage or wear, and take appropriate measures to protect it from extreme weather conditions.
Consider incorporating functional wall decorations that serve a dual purpose, such as vertical gardens, hanging planters, or wall-mounted shelves. These not only add visual interest but also provide a practical use, maximizing the functionality of your small patio.
Personalize your patio by showcasing your own artwork or photographs. Frame and display your own creations, family pictures, or vacation snapshots. This adds a unique touch and creates a sense of connection and intimacy with your outdoor space.
Whether it’s a vibrant mural, a stunning metal sculpture, or a collection of framed photographs, artwork or wall decorations infuse character and vibrancy into your small patio. They elevate the aesthetics, create visual interest, and reflect your personal style, making your outdoor space a true reflection of yourself.
Outdoor Bar Cart
An outdoor bar cart is a stylish and practical addition to your small patio, bringing the convenience of a mobile bar right to your outdoor space. It offers a designated area for serving drinks and cocktails while adding a touch of sophistication and elegance.
When selecting an outdoor bar cart, choose one that is specifically designed to withstand outdoor conditions. Opt for materials such as teak, aluminum, or stainless steel, which are durable and resistant to rust and weather damage.
Consider the size and storage capacity of the bar cart to ensure it fits well within your patio’s layout and can accommodate your beverage essentials. Look for a cart with shelves, compartments, or hooks to hold glasses, bottles, and bar tools.
Outdoor bar carts come in various styles, from modern and sleek designs to more rustic or vintage-inspired options. Select a style that complements your patio’s overall theme and personal taste.
Accessorize your outdoor bar cart with the essentials for creating refreshing drinks. Stock it with a variety of glassware, including wine glasses, cocktail glasses, and highball glasses. Have a selection of mixers, garnishes, and bar tools such as a cocktail shaker, muddler, and bottle opener.
Consider adding a small ice bucket or cooler to the bar cart to keep drinks cool and refreshing, especially during hot summer days. You can also include a tray or a cutting board for serving or preparing drink garnishes.
Utilize the extra space on the cart to add decorative elements that enhance the ambiance of your patio. Incorporate a small vase of fresh flowers, a scented candle, or even outdoor string lights to create a festive and inviting atmosphere.
Mobility is one of the greatest advantages of an outdoor bar cart. You can easily move it around your patio or even bring it to different areas of your outdoor space when entertaining. This allows you to cater to the needs of your guests and create a convenient and functional serving station.
When not in use, you can cover your outdoor bar cart or store it indoors to protect it from harsh weather conditions or excessive sunlight. This will help prolong its lifespan and preserve its appearance for years to come.
An outdoor bar cart is not only a practical addition to your small patio but also a statement piece that adds sophistication and style. It brings the element of entertainment and makes your outdoor space feel like a chic and welcoming extension of your home.
Mirrors for Illusion of Space
Mirrors are a magical and versatile tool that can significantly enhance the look and feel of your small patio. By strategically placing mirrors, you can create an illusion of space, brightness, and depth, transforming your outdoor area into a more open and visually expansive oasis.
When selecting mirrors for your small patio, opt for ones specifically designed for outdoor use. Look for mirrors that are made with weather-resistant materials that can withstand rain, sunlight, and other outdoor elements. Consider options with sturdy frames or those designed to be mounted directly onto walls or fences.
Place mirrors in areas that will have the most impact. For example, mounting a mirror on a wall or fence opposite a window or open space can reflect natural light and create an illusion of a larger and brighter patio. Mirrors can also be strategically positioned to reflect plants or other visually appealing elements, enhancing their presence and making your outdoor space seem more lush and vibrant.
Consider using multiple mirrors of different shapes and sizes to add visual interest and create a dynamic arrangement. Grouping mirrors together or using them in a pattern can create a stunning visual statement while still achieving the desired illusion of space.
One clever way to incorporate mirrors into your small patio design is by using mirrored panels or tiles in vertical garden structures. These vertical gardens not only make efficient use of space but also create a striking visual effect as the plants appear to be multiplied and reflected in the mirrors, creating a sense of depth and enchantment.
Be mindful of the placement of mirrors to avoid unwanted glare or reflections of undesirable elements. Position them to reflect pleasant views or focal points while minimizing reflections of cluttered areas or unattractive surroundings.
Regularly clean and maintain your outdoor mirrors to keep them free from dust, dirt, and other outdoor debris. Use a soft cloth or non-abrasive cleaner to gently wipe the surface and maintain its clarity and shine.
Remember that using mirrors in your small patio is not just about creating an optical illusion of space; it’s about adding a touch of beauty and sophistication. Mirrors have the ability to elevate the overall aesthetics of your outdoor space and make it feel more inviting and expansive.
By strategically incorporating mirrors into your small patio design, you can create a visually stunning and spacious outdoor haven where you can enjoy your surroundings and make the most of your limited space.
Conclusion
Small patios may pose a challenge when it comes to creating a functional and inviting outdoor space, but with the right ideas and a touch of creativity, you can transform your limited area into a charming and enjoyable oasis. By utilizing vertical space, choosing compact furniture, and incorporating clever design elements, you can maximize your patio’s potential and create a stylish and functional extension of your home.
Vertical gardens offer a practical and visually appealing way to add greenery without taking up floor space, while compact furniture and dual-purpose pieces provide functionality and versatility. Built-in benches, hanging plants, and outdoor rugs add beauty and charm to your patio, while privacy screens and water features create a serene and tranquil atmosphere.
Outdoor curtains, artwork, and mirrors can enhance the aesthetics and create a more personalized look, while features like fire pits, hammocks, and outdoor bar carts add a touch of luxury and cozy comfort. And let’s not forget the joy and satisfaction that comes from growing your own herbs or vegetables in a small patio garden.
When designing your small patio, consider the size and layout of the space, choose materials and furniture that are weather-resistant and designed for outdoor use, and infuse your personal style and creativity into the design. Maintain and care for your patio elements to ensure they remain in excellent condition and last for years to come.
Remember, a small patio doesn’t mean you have to sacrifice style, comfort, or functionality. With the right ideas and thoughtful planning, you can transform your small patio into a beautiful and inviting space that will be enjoyed by you, your family, and your guests for years to come.
So, go ahead and embrace the possibilities of your small patio. Let your creativity shine and create an outdoor haven that reflects your unique personality and allows you to fully enjoy the beauty and tranquility of the great outdoors.
Frequently Asked Questions about 20 Small Patio Ideas To Maximize Your Outdoor Space
Was this page helpful?
At Storables.com, we guarantee accurate and reliable information. Our content, validated by Expert Board Contributors, is crafted following stringent Editorial Policies. We're committed to providing you with well-researched, expert-backed insights for all your informational needs.


0 thoughts on “20 Small Patio Ideas To Maximize Your Outdoor Space”